NestJS-DDD-DevOps
![]()
![]()
![]()
![]()

![]()


The purpose of this repository is to create a ready-to-use project following Domain-Driven Design, Clean Architecture and Functional Programming best practices combined with some DevOps techniques such as Continuous Integration, Continuous Delivery and Quality Assurance.
Key Features:
- Modular Monolith Architecture with clear domain boundaries
- Test-Driven Development with Jest and Supertest
- Automated CI/CD via GitHub Actions
- Semantic Versioning & Conventional Commits
- Rate Limiting, Caching, Data Validation and API Versioning
- Dockerized environment with PostgreSQL
The project is completely open source under the MIT license, feel free to contribute by opening an issue, a pull request or a discussion topic.
In the following chapters you will find a description of the main choices, technologies and techniques adopted.
DISCLAIMER: This page is not an article about Domain-Driven Design or Clean Architecture: the sole purpose of this page is to explain some of the principles and techniques used in this project. For some of the chapters there is an introduction and a basic explanation to provide all the elements necessary to understand the choices made.
Stack
| NodeJS | TypeScript | NestJS | PostgreSQL | Mikro-ORM | Docker |
|---|---|---|---|---|---|
 |
Instructions
- Fork this repository and use it as
templaterepository - Install all dependencies
npm install - Start the PostgreSQL development database in a local container
docker-compose up -d - Provide a
.envand.env.testfiles with all required environment variables (check out.env.distexample file) - Create and generate the database schema from your entities’ metadata:
npm run schema:update - Start to create your modules and entities following all the principles explained in the below chapters!
Table of Contents
- Architecture
- Domain-Driven Design
- Clean Architecture
- Testing
- GraphQL
- Functional Programming
- Workflow Organization
- Semantic Versioning
- Continuous Integration
- Continuous Delivery
- Automatic Dependency Update
- Backend Best Practices
Architecture
NestJS provides a modular architecture that allows the creation of loosely coupled and easily testable components.
Although this framework natively supports the development of microservice or event-driven architectures, they will not
be considered because the purpose of this project is just to create a simple, extensible and ready-to-use application.
For this reason, we will implement a Modular Monolith: an architectural pattern that structures the
application into independent modules or components with well-defined boundaries.
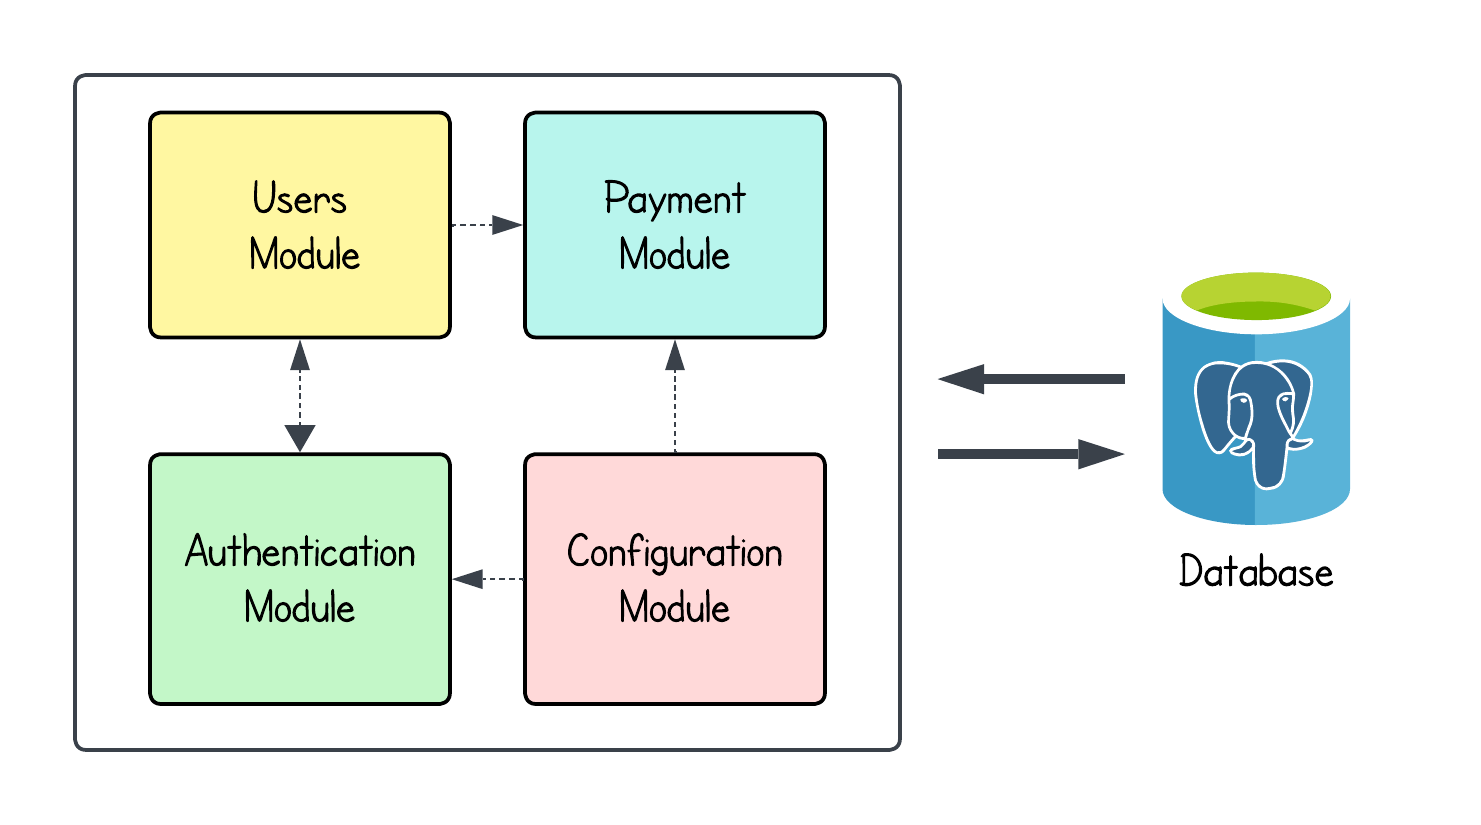
Example of a Modular Monolith Architecture.
In addition to simplicity and extensibility, a modular monolith allows us to start the development of the application as
a single repository and deployment unit, with distinct and clear boundaries between business contexts.
By this way, we can gradually refactor our architecture to a microservice architecture rather than implementing it from
the beginning.
In NestJS, applications typically consists of multiple modules, each serving a specific purpose or feature set.
A module is a class annotated with the @Module() decorator, and it encapsulates a specific domain or feature of the
application. A module class define providers and inject them into other components leveraging Dependency Injection.
Domain-Driven Design
Domain-Driven Design (DDD), introduced by Eric Evans in his seminal book Domain-Driven Design: Tackling Complexity in the Heart of Software, is an approach to software development that focuses on modeling software to match the complex realities of the business domain. It emphasizes collaboration between domain experts and software developers to build a shared understanding of the problem domain and to reflect that understanding in the code.
DDD is structured into two main aspects:
- Strategic Design: focuses on the high-level design of the system, defining boundaries and relationships between different parts of the domain.
- Tactical Design: deals with patterns and building blocks that guide the implementation within the defined boundaries.
Strategic Design
Strategic design provides a big-picture approach to defining how different subdomains interact and how to partition a system into well-defined parts. On this page we will not cover the Problem Space, which includes, for example, the identification of subdomains, but we will discuss about how to manage and implement the various Bounded Contexts designed.
A Bounded Context defines the explicit boundaries in which a particular domain model is defined and applied. Each context has its own domain logic, rules, and language, preventing ambiguity and inconsistencies when working with other contexts. It helps in maintaining clarity and separation of concerns within complex systems.
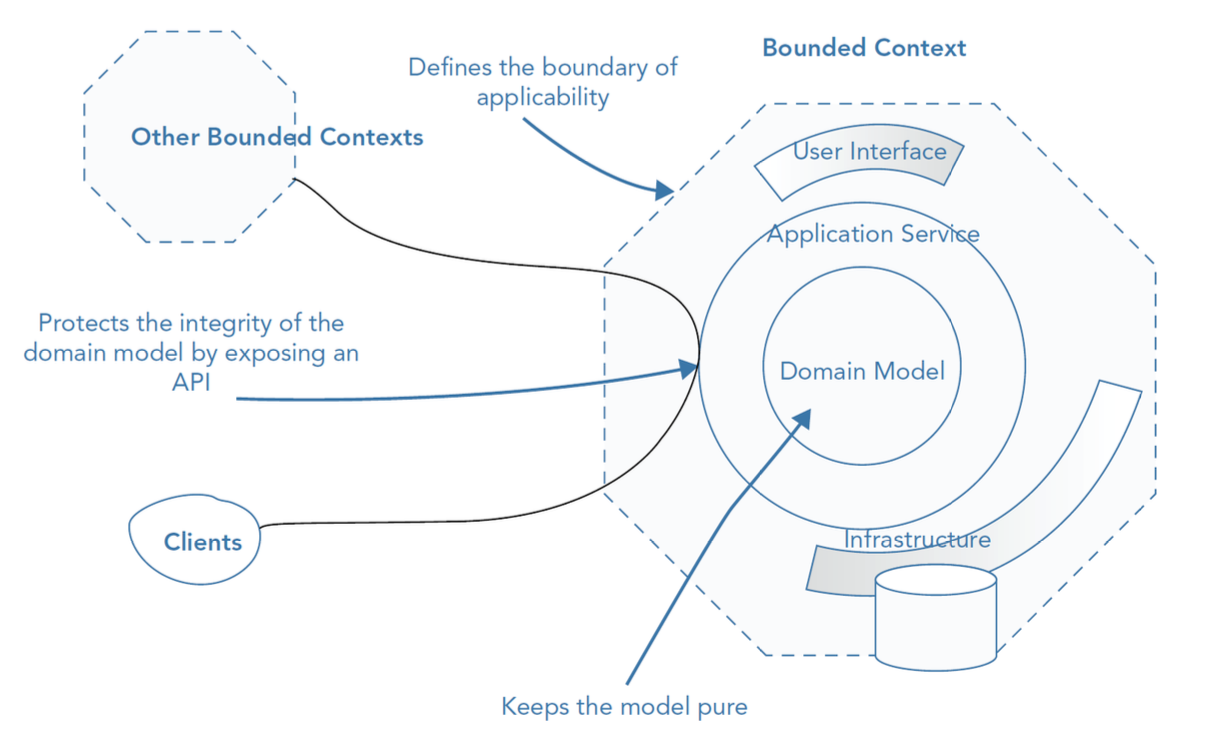
Schema of Bounded Context Anatomy.
In a NestJS project, every bounded context can be implemented as a separate module.
Each module encapsulates its own domain logic, application services, and infrastructure concerns, ensuring clear separation and maintainability. For this reason, each module’s name should reflect an important concept from the Domain and have its own folder with a dedicated codebase (src/modules).
This approach ensures loose coupling: refactoring of a module internals can be done easier because outside world only depends on module’s public interface, and if bounded contexts are defined and designed properly each module can be easily separated into a microservice if needed without touching any domain logic or major refactoring.
To ensure modularity and maintainability, we have to make each module self-contained and minimize interactions between them. It’s very important to treat each module as an independent mini-application that encapsulates a single business context and to avoid direct imports between modules to prevent tight coupling. This practice helps maintain separation of concerns, reduces dependencies, and prevents the code base from becoming a tangled and unmanageable structure.
One of the most common factors that leads to the creation of dependencies and tight coupling between different bounded contexts is definitely the way they communicate.
There are several ways to facilitate communication between modules while maintaining loose coupling:
- Event-Based Communication: NestJS provides the
@nestjs/event-emitterpackage to facilitate communication between modules via Domain Events. Modules can publish domain events using theEvent Emitterclass, allowing other modules to subscribe and react to changes asynchronously. - Dependency Injection: modules can inject services from other modules by importing them explicitly in the module definition, ensuring proper encapsulation.
@Module({ imports: [UsersModule], providers: [OrdersService], }) export class OrdersModule {} - Shared Service: a shared module can be created to hold common logic and utilities needed across multiple bounded contexts.
- CQRS Pattern: using the
@nestjs/cqrs package, commands and queries can be dispatched to other modules following a clear separation of concern.
Tactical Design
Tactical design is a set of design patterns and building blocks that we can use in the construction of our Domain Model.
These building blocks are built around the OOP and FP techniques and their role is to help to manage complexity and ensure clarity behavior within the domain model.
Entities
Entities represent domain objects that have a distinct identity and lifecycle. Unlike value objects, which are defined solely by their attributes, entities are primarily distinguished by their identity, which remains consistent over time despite changes to their attributes.
Entities should be behavior-oriented, and they should expose expressive methods that communicate domain behaviors instead of exposing state.
NestJS provides support for entities through its integration with Object-Relational Mapping (ORM) tools such as Mikro-ORM, TypeORM and Prisma. While these tools help with persistence, it is essential to align NestJS entities with DDD principles to ensure a clear separation of concerns.
There are two primary strategies to consider when integrating NestJS entities with DDD:
-
Separating
Persistence EntitiesfromDomain Entities: with this approach, the domain model is kept clean and independent of the persistence layer. Persistence entities are used strictly for database operations, while domain entities encapsulate business logic. The pros of this approach are: a clear separation of concerns, an improved maintainability and testability and finally domain entities remain persistence-agnostic. The main drawback is that it introduces additional complexity due to the need for mapping between domain and persistence entities. -
Using
Persistence EntitiesasDomain Entities: this approach consolidates domain and persistence concerns into a single model, leveraging persistence entities to contain both database and domain logic. The benefit of this approach is the simplicity of the codebase by reducing duplication while the drawback is the coupling between domain logic and persistence concerns.
Value Objects
A value object is an immutable type that is defined by its properties rather than a unique identity.
Unlike entities, which are distinguished by their identities, value objects are distinguished by their attributes. Two value objects are considered equal if all their attributes are the same.
Examples of value objects are things like numbers, dates, monies and strings.
export abstract class ValueObject<T> {
    protected readonly props: T;

    constructor(props: T) {
        this.props = Object.freeze(props);
    }

    equals(other?: ValueObject<T>): boolean {
        if (other === null || other === undefined)
            return false;
        return JSON.stringify(this.props) === JSON.stringify(other.props);
    }
}
Repositories
The Repository pattern is a design principle that abstracts data access logic behind a set of interfaces, separating the business logic from direct interactions with data sources, such as databases.
It centralizes data access operations, making code more maintainable, testable, and flexible.
To reduce dependencies and coupling between layers, interfaces are defined in the domain layer, but the implementation, which interacts with the database, resides outside in the infrastructure layer.
export interface Repository<T> {
    findById(id: number): Promise<Option<T>>;

    findAll(): Promise<Collection<T>>;

    save(entity: T): Promise<T>;

    update(data: Partial<T>): Promise<T>;

    delete(id: number): Promise<boolean>;
}
Domain Services
a Domain Service is a stateless, operation-centric class that encapsulates domain logic or operations that don’t naturally fit within the boundaries of an Entity or a Value Object. These services are all about performing actions or providing domain-specific functionality that doesn’t belong to a single entity.
export interface DomainService<T> {
    execute(): Promise<T>;
}
Application Services
An Application Service is a service that represents a use case or operation in the application. It is typically implemented as a class that contains the application-specific business logic for performing a specific operation.
export interface ApplicationService<I, O> {
    execute(input: I): Promise<O>;
}
While both of application services and domain services implement the business rules, there are fundamental logical and formal differences.
application servicesimplement the use cases of the application, whiledomain servicesimplement the core domain logic.application servicesreturn Data Transfer Objects whiledomain servicesmethods typically get and return the domain objects (entities, value objects).domain servicesare typically used by theapplication servicesor otherdomain services, whileapplication servicesare used by the Presentation Layer or Client Applications.
Domain Events
Domain events are events that occur in a specific area or domain and are important for the business logic of an application.
In contrast to integration events, which can affect the entire application, domain events are closely linked to the specific domain or specialist area of your application.
Using domain events improves the modularity of an application, as individual components are loosely coupled and can work independently of each other.
export abstract class DomainEvent<T> {

    public readonly eventId: string;

    public readonly name: string;

    public readonly timeStamp: Date;

    public readonly payload: T;

    public readonly correlationId?: string;

    public readonly version: number;
}
CQRS
Command Query Responsibility Segregation (CQRS) is a powerful architectural pattern used to separate the read and write sides of an application.
In CQRS, we have two distinct models: a command model that handles the commands that modify the state, and a query model that handles the queries that read the state.
The command model is usually implemented with an event-sourced aggregate, which is an entity that stores its state as a sequence of domain events.
The query model is usually implemented with a projection, which is a denormalized view of the state that is updated by subscribing to the domain events.
By using domain events, we can decouple the command and query models, and optimize them for different purposes.
In this project we’ll use the @nestjs/cqrs package to implement the CQRS pattern.
If you want to deep dive and to understand in detail how this library works, please refer to the official documentation.
Clean Architecture
Once the various bounded contexts have been identified and designed, it is necessary to proceed with the internal design of each module.
In this context, we will be helped by the principles of Clean Architecture, defined by Robert C. Martin in this article.
Clean architecture is a software design philosophy that separates the elements of a design into ring levels. An important goal of clean architecture is to provide developers with a way to organize code in such a way that it encapsulates the business logic but keeps it separate from the delivery mechanism.
This architecture attempts to integrate some of the leading modern architecture like Hexagonal Architecture, Onion Architecture, Screaming Architecture into one main architecture.
NestJS, with its modular structure and robust features, provides an excellent foundation for applying Clean Architecture principles.
Since each module corresponds to a different Bounded Context, we are going to apply these principles within each module of the application.
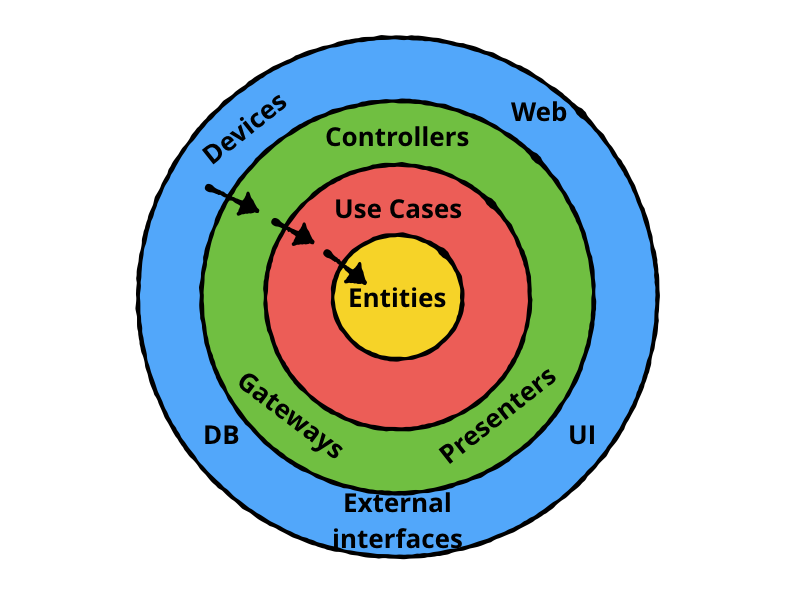
Different layers of the Clean Architecture.
In this application, we are going to use these Clean Architecture layers:
- Entity Layer: contains all domain elements. It is the central, most stable and therefore least volatile layer of any module, and the concepts defined within it are completely independent of anything defined in the external layers, resulting in decoupling from the technologies and libraries used.
- Use Case Layer: contains all the use cases of the system. They use only the domain concepts defined in the innermost Entity layer acting as orchestrators of entities encapsulating business policies. They thus allow the details of domain elements to be abstracted behind a coarse-grained API that reflects the system’s use cases. This allows unit-testing of system use cases without having dependencies on the infrastructure.
- Application Layer: contains the controllers and presenters. The former handle the orchestration of the application flow by managing the interaction between external actors and the business policies defined in the core. They therefore do not represent domain concepts let alone define business rules. The second ones deal with serialization and deserialization, then presentation, of data to the infrastructure layer or use case layer, thus adapting the data to the most convenient format for the layers involved.
- Infrastructure Layer: contains all the technological choices of the system. They are confined to the outermost layer because they are more volatile thus allowing everything defined in the innermost layers to remain valid in the face of technological changes, providing more flexibility to the system.
In cases where inner layers must interact with abstractions defined in upper layers, as defined in the Clean Architecture article, the principle of Dependency Inversion (DIP) is exploited to make dependencies go only inward. Whenever this occurs, an interface is defined in the inner layer that is then implemented in the outer layer. In this way, dependencies remain only inward, without depending on concepts defined in the outer layers.
Accordingly, each module of the application will have the following directory structure:
.
└── src
    ├── app.module.ts
    ├── main.ts
    ├── config
    ├── lib
    └── modules
        └── module-x
            ├── domain
            ├── usecase
            ├── application
            └── infrastructure
        └── module-y
            ├── domain
            ├── usecase
            ├── application
            └── infrastructure
Testing
Testing is an important process in the software development lifecycle. It involves verifying and validating that a software application is free of bugs, meets the technical requirements set by its design and development, and satisfies user requirements efficiently and effectively.
In this project we will implement two different types of tests:
-
Unit Tests: unit tests are very low level and close to the source of an application. They consist in testing individual methods and functions of the classes, components, or modules used by your software. They are generally quite cheap to automate and can run very quickly by a continuous integration server.
-
End-to-end Tests: end-to-end testing replicates a user behavior with the software in a complete application environment. It verifies that various user flows work as expected and can be as simple as loading a web page or logging in or much more complex scenarios verifying email notifications, online payments, etc…
To automate the execution of the tests we will run them inside a Continuous Integration pipeline, which will be explained in the next chapters.
Unit Testing
In this project, to implement Unit Tests we will use the following packages:
@nestjs/testing: provides a set of utilities that enable a more robust testing process.jest: serves as a test-runner and also provides assert functions and test-double utilities that help with mocking, spying, etc.
In the following code block it’s possible to see an example of unit testing with Jest library:
describe('CatsController', () => {
  let catsController: CatsController;
  let catsService: CatsService;

  beforeEach(() => {
    catsService = new CatsService();
    catsController = new CatsController(catsService);
  });

  describe('findAll', () => {
    it('should return an array of cats', async () => {
      const result = ['test'];
      jest.spyOn(catsService, 'findAll').mockImplementation(() => result);
      expect(await catsController.findAll()).toBe(result);
    });
  });
});
Unit tests will be run with this command:
npm run test
End-to-end Testing
In this project, to implement E2E Tests we will use the following packages:
@nestjs/testing: provides a set of utilities that enable a more robust testing process.supertest: serves as a test-runner and also provides assert functions and test-double utilities that help with mocking, spying, etc.
In the following code block it’s possible to see an example of end-to-end testing with Supertest library:
describe('HealthCheck (E2E)', () => {
  let app: INestApplication;

  beforeEach(async () => {
    const moduleFixture: TestingModule = await Test.createTestingModule({
      imports: [AppModule],
    }).compile();
    app = moduleFixture.createNestApplication();
    await app.init();
  });

  it('should always return 200', () => {
    return request(app.getHttpServer()).get('/health').expect(200);
  });
});
E2E tests will be run with this command:
npm run test:e2e
GraphQL
GraphQL is a query language for APIs that allows clients to request only the data they need. Unlike REST, which relies on fixed endpoints and multiple requests, GraphQL consolidates requests into a single query, reducing network overhead and improving efficiency.
When integrating GraphQL with NestJS, it is possible to define schemas using two approaches:
- Schema-First (SDL-Based)
The Schema Definition Language (SDL) approach follows a traditional GraphQL method where the schema is written in a.graphqlfile and then mapped to resolvers in the application. - Code-First (Decorator-Based)
The Code-First approach uses TypeScript decorators to define GraphQL types and resolvers, which NestJS automatically converts into a GraphQL schema.
In this project we will use the Code-First approach:
@ObjectType()
export class UserModel {
    @Field(() => String)
    readonly id!: string;

    @Field({ nullable: true })
    readonly firstName?: string;

    @Field({ nullable: true })
    readonly lastName?: string;

    @Field(() => String)
    readonly email!: string;

    @Field(() => Date, { nullable: true })
    readonly createdAt?: Date;
}
At this point, we’ve defined the objects (type definitions) that can exist in our data graph, but clients don’t yet have a way to interact with those objects. To address that, we need to create a resolver class. In the code first method, a resolver class both defines resolver functions and generates the Query type.
@Resolver(() => UserModel)
export class UserResolver {
    constructor(
        private readonly queryBus: QueryBus,
        private readonly commandBus: CommandBus,
    ) {
    }

    @AuthRoles(ApiRole.ADMIN)
    @Query(() => UserModel, {})
    async getUser(
        @Args('id', { type: () => String }) id: string,
    ): Promise<UserModel> {
        return getOrThrowWith(
            map(await this.queryBus.execute(new GetUserByIdQuery(id)), toUserModel),
            () =>
                new GraphQLException('User Not Found', {
                    extensions: {
                        http: {
                            status: HttpStatus.NOT_FOUND,
                        },
                    },
                }),
        );
    }

}
If you want to deep dive and to understand in detail how GraphQL works, please refer to the official documentation.
Functional Programming
In this section we are going to discuss and to explore some technical choices used in the development of this project related to functional programming.
Functional programming is a programming paradigm where programs are constructed by applying and composing functions. It is a declarative programming paradigm in which function definitions are trees of expressions that map values to other values, rather than a sequence of imperative statements which update the running state of the program.
Since this is a web server using Node.js and TypeScript, the project will not be fully functional like Scala or Haskell applications.
Instead, we will try to apply the following principles belonging to functional programming with the aim of improving the quality of our code:
-
Immutability: one of the biggest headaches in JavaScript is dealing with state changes and unexpected side effects. With FP principles like immutability, we avoid accidental data mutations. Instead of modifying objects directly, we create new ones. This approach makes our app more predictable and easier to debug. TypeScript’s type system helps enforce immutability with tools like readonly and utility types, ensuring your data stay consistent.
-
Pure Functions: pure functions always return the same output for the same input and don’t mess with the outside world. This predictability makes our code easier to test and reason about. With TypeScript, we get an added layer of security by defining precise input and output types.
-
Higher-Order Functions: higher-order functions (HOFs) let us write reusable and composable code. They can be used to create reusable abstractions that can simplify complex code and make it easier to understand.
-
Type Safety: with TypeScript, you catch mistakes before they become runtime issues. FP concepts align perfectly with TypeScript’s static typing, reducing the chances of passing around undefined or null by accident.
-
Declarativity: functional programming encourages writing code that focuses on what should happen rather than how it happens. This leads to cleaner, more readable code, which is easier for us to maintain.
To implement and follow all of these FP principles we are going to use the Effect-TS library, which belongs to the Effect ecosystem.
The effect-ts library is a powerful tool for managing functional programming paradigms in a Node.js and TypeScript project. It provides a comprehensive set of utilities for handling side effects, asynchronous operations, and error management in a purely functional and type-safe manner.
Its core abstractions, such as Effect, Option, and Either, allow developers to build complex applications while maintaining clarity and scalability. Whether handling HTTP requests, database interactions, or background tasks, effect-ts simplifies the process of structuring the logic in a way that is predictable, testable, and resilient to failure.
In the following code snippet you can find an example of effect-ts library usage.
import { Option } from "effect"

const computation = (): Option<number> =>
  Math.random() < 0.5 ? some(10) : none()

const alternativeComputation = (): Option<number> =>
  Math.random() < 0.5 ? some(20) : none()

const program = computation().pipe(
  Option.orElse(() => alternativeComputation())
)

const result = Option.match(program, {
  onNone: () => "Both computations resulted in None",
  onSome: (value) => `Computed value: ${value}`
})
Workflow Organization
In order to make the best use of DevOps practices, it is necessary to adopt an appropriate Workflow Organization.
In this project we are going to use a custom version of the Gitflow Workflow.
Instead of a single main branch, this workflow uses two branches to record the history of the project. The main branch stores the official release history, and the develop branch serves as an integration branch for features. It’s also convenient to tag all commits in the main branch with a version number. Each new feature should reside in its own branch, which can be pushed to the central repository for backup/collaboration. But, instead of branching off of main, feature branches use develop as their parent branch. When a feature is complete, it gets merged back into develop. Features should never interact directly with main.

Gitflow branch structure.
The overall flow of Gitflow is:
- A develop branch is created from main
- Feature branches are created from develop
- When a feature is complete it is merged into the develop branch
- When we want to trigger a release the develop branch is merged into main
- If an issue in main is detected a hotfix branch is created from main
- Once the hotfix is complete it is merged to both develop and main
In this project, we are also going to adopt a rebase policy instead of a merge policy to keep a cleaner and linear project history.
In addition, in order to make the meaning of commits more explicit, we are going to adopt the Conventional Commits specification, which will simplify the use of automatic tools for application versioning.
In order to check the correct use of the Conventional Commits specification and compliance with quality standards on the produced code, we are going to use the following git hooks:
pre-commit: verifies the compliance with quality standards on code using the project linter and running unit testscommit-msg: verifies compliance with the Conventional Commit specification
To define and configure the hooks we are going to use the tool Lefthook, which will install the hooks during the prepare step of the node project.
Semantic Versioning
Software versioning is the process of assigning either unique version names or unique version numbers to unique states of computer software. Within a given version number category (e.g., major or minor), these numbers are generally assigned in increasing order and correspond to new developments in the software.
Regarding the versioning process, in this project we are going to follow the Semantic Versioning specification.
According to Semantic Versioning, a version consists of three numbers: Major, Minor, and Patch. Each change to the source code results in an increase of one of these numbers based on the importance of the changes made.
Using the Conventional Commit specification described earlier, it was possible to use the semantics of commits to understand when to make a new release and the importance of it.
Accordingly, we are going to use the Semantic-release-bot, which follows the Semantic Versioning specification, to automate the software release process and changelog generation by analyzing commits in order to identify the correct version increment. For the type of release to be associated with each commit, we are going to use the semantic-release-preconfigured-conventional-commits configuration. The bot is triggered upon the push of a commit on the main branch, and if, upon analyzing the commits, a new release needs to be executed, the bot will take care of executing a new release on GitHub Release.
Continuous Integration
One of the fundamental practices of DevOps is Continuous Integration. It aims to continuously integrate code with the main line of development so that integration problems are detected early and software quality is improved by enabling a faster and more reliable development process.
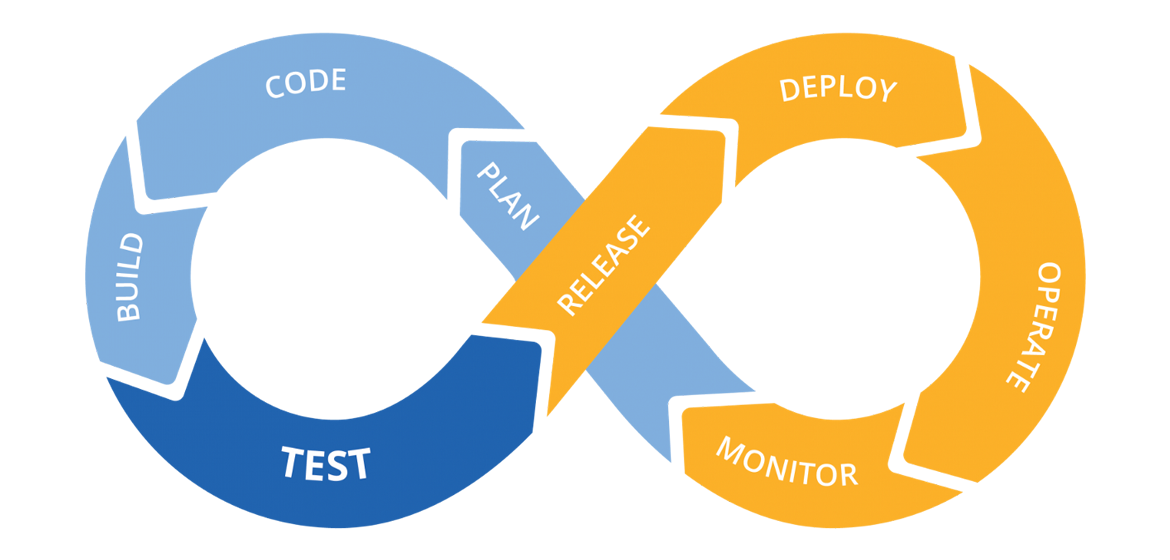
Pipeline of Continuous Integration and Delivery.
In this project we are going to use GitHub Actions to create and execute our CI workflows:
- Build
- Release
The Build workflow consists of running tests and code quality checks on all combinations of operating system and different versions of Node.js in order to ensure proper performance on all platforms of interest.
First, we are going to execute the unit tests and then, we are going to emulate a real scenario executing a PostgreSQL database instance and running end-to-end tests to check the integrity of the application and to prevent regression errors.
The workflow is configured to run on pushes or pull request creation. In this way, it is possible to run the tests and provides the results of each test in the pull request, so you can see whether the change in your branch introduces an error. When all CI tests in the build workflow pass, the changes we pushed are ready to be reviewed by a team member or merged. When a test fails, one of our changes may have caused the failure.
The Release workflow is responsible for running the semantic release bot to manage the automatic release of new versions of the software. This workflow is executed only if you are on the main branch and if a build workflow has previously completed successfully.
Continuous Delivery
Continuous Delivery (CD) is a software development practice that enables teams to release new features, updates, and bug fixes to production environments rapidly, reliably, and sustainably. The primary goal of CD is to minimize the time between writing code and delivering it to users, while ensuring high quality and stability.
In this project, the Continuous Delivery workflow is built using GitHub Actions and Docker, and it runs on a Continuous Integration environment.
The workflow is realized in the following way:
- Automated Workflow with GitHub Actions: the workflow is triggered automatically when a successful
Releasejob is completed, ensuring only tested and verified code gets delivered. We use conditional execution to ensure that deployment only happens if the previous workflow (Release) succeeds. - Versioning: we extract version tags using
git describe --tags --abbrev=0, making sure each Docker image is tagged correctly. This approach makes rollback, tracking, and auditing deployments very easy. - Docker Containerization: we build the Docker image of the application using a custom
Dockerfile. The Dockerfile follows best practices by installing dependencies, running the build, and handling migrations and database schema creation on startup. - Deployment to GitHub Container Registry (GHCR): we securely log in to GHCR using secrets, ensuring that credentials stay protected. Then we tag both
versionedandlatestcontainer images to allows flexibility and rollback strategies.
At the end of the workflow, if all the steps are successful, we can find the docker image of the application on GitHub Packages.
So, you can download it and run it in this way:
docker run -p 3000:3000 --env-file .env ghcr.io/andrea-acampora/nestjs-ddd-devops:latest
Remember that you need to provide a .env file with all database connection variables. Alternatively, you can create a docker-compose file with a PostgreSQL service and a service containing the image you just created so that the app and database can communicate via an internal network.
Automatic Dependency Update
Keeping dependencies current is one of the most effective security methods available, since it prevents vulnerabilities from entering the code base at the outset. Updating dependencies is a complex task that takes time and often introduces technical debt. Especially in a complex dependency tree, it’s difficult to even know what libraries or packages are out of date. Manually looking for updates is time-consuming and unrewarding work. Moreover, updates may not always be compatible with existing code, and without total confidence in merging an update, developers worry that an update will break their app.
In order to automate the update of the project dependencies, we are going to use the Renovate bot.
This bot will reduce risk, improve code quality, and cut technical debt by automatically ensuring all dependencies are kept up to date. To do this, the bot will open a new pull request on a dedicated branch every time it detects a dependency update. This will trigger the running of all Unit and E2E tests in Continuous Integration and if everything is fine then the PR will be automatically merged into the base branch.
Backend Best Practices
In this section we will discuss some common backend best practices that we will use in this project. Most of them are directly supported by NestJS while others will need a custom implementation.
Caching
As reported in the offical NestJS documentation, Caching is a powerful and straightforward technique for enhancing application’s performance. By acting as a temporary storage layer, it allows for quicker access to frequently used data, reducing the need to repeatedly fetch or compute the same information. This results in faster response times and improved overall efficiency.
In this project, we will use the @nestjs/cache-manager package along with the cache-manager package. By default, with these packages use a in-memory strategy so everything is stored in the memory of the application.
In this way, if the project grows, it will be possible to use an advanced solution and a dedicated database such as Redis as it is fully supported by the @nestjs/cache-manager.
If you want to deep dive and to understand in detail how this tool works, please refer to the official documentation.
Data Validation
Data validation is one of the most crucial steps in building a robust backend system ensuring data flowing through the system is accurate, consistent, and adheres to predefined formats. By introducing data validation invalid or malicious data gets filtered out before it can impact your system.
In this project, to implement data validation we will use class-validator and class-transformer packages.
We start by binding ValidationPipe at the application level, thus ensuring all endpoints are protected from receiving incorrect data.
  app.useGlobalPipes(
    new ValidationPipe({
      transform: true,
      whitelist: true,
      forbidNonWhitelisted: true,
    }),
  );
The whitelist property is set to true to ensure that the validator will strip validated object of any properties that do not have any decorators. In this case, we can whitelist the acceptable properties, and any property not included in the whitelist is automatically stripped from the resulting object.
Alternatively, if we want to stop the request from processing when non-whitelisted properties are present, we have to set the forbidNonWhitelisted option property to true, in combination with setting whitelist to true.
To enable auto-transformation of payloads to typed objects according to their DTO classes, we have to se the transform option property to true.
Since TypeScript does not store metadata about generics or interfaces, when you use them in your DTOs, ValidationPipe may not be able to properly validate incoming data. For this reason, consider using concrete classes in your DTOs.
Once the Validation Pipe is registered globally, we can start to add some validation rules to our dtos.
import { IsEmail, IsNotEmpty } from 'class-validator';

export class CreateUserDto {
  @IsEmail()
  email: string;

  @IsNotEmpty()
  password: string;
}
If you want to deep dive and to understand in detail how this tool works, please refer to the official documentation.
Rate Limiting
Rate limiting is a set of measures put in place to help ensure the stability and performance of an API system. It works by setting limits on how many requests can be made within a certain period of time — usually a few seconds or minutes — and what actions can be taken. If too many requests are made over that period, the API system will return an error message telling you that the rate limit has been exceeded. Additionally, rate limiting can help prevent attacks that aim to overwhelm the system, such as DoS attacks, brute force attempts, and API abuse. and also can help businesses save on costs associated with managing an API system.
In this project we will use the @nestjs/throttler package.
@Module({
  imports: [
    ThrottlerModule.forRoot([{
      name: '100_CALL_PER_MINUTE',
      ttl: 60000,
      limit: 100,
    }]),
  ],
})
export class AppModule {}
With this configuration we set a maximum of 100 requests per IP address in a 60-seconds interval.
If you want to deep dive and to understand in detail how this tool works, please refer to the official documentation.
API Versioning
API versioning is the practice of transparently managing changes to your API. You should version your API whenever you make a change that will require consumers to modify their codebase in order to continue using the API. This type of change is known as a “breaking change,” and it can be made to an API’s input and output data structures, success and error feedback, and security mechanisms.
There are several approaches to API versioning, including:
- URI Versioning
- Query Parameter Versioning
- Header versioning
- Consumer-based versioning
In this project we will enable URI versioning globally, in the following way:
  app.enableVersioning({
    type: VersioningType.URI,
    defaultVersion: '1',
  });
The version in the URI will be automatically prefixed with v by default, however the prefix value can be configured by setting the prefix key to your desired prefix or false if you wish to disable it.
In addition to the global configuration, it is also possible to specify the version of individual routes or controllers. In this case, this version will override any other version that would affect the route.
If you want to deep dive and to understand in detail how this tool works, please refer to the official documentation.
Contributors